Blender to TSL/Use it
Exporting a material
Export a material from Blender's material panel as a three.js TSL module, and read the notes it gives you.
You don’t need an AI agent to use the add-on. Everything it does is also in Blender’s UI, for one material at a time.
Where it is
Select an object, then open Properties ▸ Material ▸ three.js TSL Export. The panel starts closed: click its header to open it. It exports the active material of the active object, so pick the material slot first if the object has several.
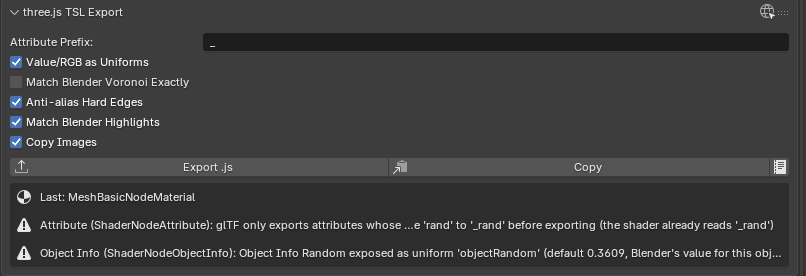
It’s also in File ▸ Export ▸ three.js TSL Material (.js), which exports the active material with the panel’s options.
Export, Copy or open in the Text Editor
| Button | What it does |
|---|---|
| Export .js | Writes the module to a file. The file name defaults to <Material>.tsl.js. With Copy Images on, the material’s images are copied next to it. |
| Copy | Copies the module to the clipboard, ready to paste into your project. |
| Text Editor icon | Writes the module into a Blender text block named <Material>.tsl.js and shows it in an open Text Editor, so you can read it before exporting. |
Each module exports a factory function named after the material, create<Material>Material(), as its default export. Using the module shows how to call it.
Options
The options are saved in the .blend file, so everyone who opens it exports the same way.
| Option | Default | What it does |
|---|---|---|
| Attribute Prefix | _ |
Added to custom attribute names the material reads. Blender’s glTF exporter only writes attributes whose names start with _, so the default matches a mesh exported as glTF. |
| Value/RGB as Uniforms | On | Value and RGB nodes become uniforms you can change at runtime. They’re named after the node labels. Off: their values are baked into the shader. |
| Match Blender Voronoi Exactly | Off | Includes a port of Blender’s Voronoi texture in the module, so cells land exactly where Blender puts them. Off: three.js’ built-in Voronoi, with the same scale and range but different cells, and less code. Noise and Wave textures always match. |
| Anti-alias Hard Edges | On | Blends Constant Color Ramp and Checker edges over one screen pixel, like Blender’s anti-aliased render. Off: hard edges, which look jagged in three.js. |
| Match Blender Highlights | On | Uses the material’s roughness exactly as Blender does. Off: three.js adds roughness on curved or small geometry (specular anti-aliasing), so highlights come out wider and dimmer than in Blender, but shimmer less in motion. |
| Copy Images | On | With Export .js, copies the material’s image textures next to the exported file. |
Notes about the conversion
After an export the panel shows a box with the three.js material class it picked, and a note for each node it couldn’t convert exactly. The same notes are written as comments at the top of the module. A material that converted exactly shows Converted with no notes.
Notes name the node and say what happened. Typical ones:
- Approximated nodes, such as Subsurface Scattering or Toon BSDF, which become the nearest thing three.js has. Supported nodes lists what’s exact and what isn’t.
- Attributes that won’t survive a glTF export. For example, an Attribute node reading
rand: Blender’s glTF exporter only writes attributes whose names start with_, so rename it to_randbefore exporting the mesh. The module already reads_rand. - Values that depend on the object, such as Object Info ▸ Random, which become uniforms with Blender’s value for this object as the default.
Which material class you get
The add-on picks the lightest three.js node material that can show the shader:
- MeshBasicNodeMaterial for emission only
- MeshLambertNodeMaterial for diffuse only
- MeshStandardNodeMaterial for the usual metal/rough materials
- MeshPhysicalNodeMaterial when the shader uses coat, sheen, transmission, IOR, specular, thin film or anisotropy
Exporting the mesh
The module holds the material only. Export the mesh with Blender’s own glTF exporter (File ▸ Export ▸ glTF 2.0) and assign the material to it in three.js. If the material reads mesh data, check these in the glTF export:
- Custom attributes must be named with the Attribute Prefix (
_by default), e.g._rand. GLTFLoader lower-cases the names; the module expects that. - Vertex colours come from
COLOR_0, which is the active colour attribute at export. - Tangents. Tangent-space normal maps and the Tangent node match Blender best with a tangent attribute: tick Tangents in the glTF exporter’s Mesh options.
- UVs need no setup. The module samples textures the way glTF stores them.
An AI agent exports the mesh for you with the right names, from a temporary copy so your .blend isn’t changed.